One of the advantages of using Google Tag Manager for implementing your Facebook Pixel tracking is that then you have the ability to easily create Custom Events with Google Tag Manager to track other user interactions with the Facebook Pixel besides the 17 Standard Events predefined by Facebook.
In this tutorial, we are going to show you everything you need to know about setting up Custom Events with Google Tag Manager:
- Things to check before setting up Facebook Custom Events with Google Tag Manager
- Some Facebook Custom Events Example
- two ways you can set up Facebook Custom Events with Google Tag Manager
- how to set up a Facebook Custom Event with Custom Template method in GTM
We have also answered the most frequently asked questions related to Facebook Custom Event implementation at the end of this article.
Before setting up Facebook Custom Events with Google Tag Manager
There are four things you should check before setting up Facebook Custom Events with Google Tag Manager:
First, make sure that your Facebook Pixel base code is installed on your website and it is working correctly. The fastest way to check this is by using the Facebook Pixel Helper Chrome extension and by opening your website. If the PageView event has fired as expected and the Pixel Helper is not indicating any issues then you are good to go.
Secondly, make sure that your current Facebook Pixel Events are implemented in Google Tag Manager. Although it is not 100% necessary to have all your Pixel Events implemented in one place, to be able to easily debug your implementation if there is an error, it is best practice to use one method of implementation.
Also, we would suggest using the same setup method for all Standard and Custom Events. If you used the Custom Template to set up your PageView event, we would stick with this method for all other FB Pixel events as well. (see the explanation later in the article).
Last but not least, before you would set up a new FB Custom Event, you should ask yourself if it is really necessary to set up a Custom Event for this user interaction or you can already track that user action with the 17 Standard Events defined by Facebook. If you are not sure, you can check all 17 Standard Events that are predefined by Facebook here.
Also, if you are not 100% sure what Facebook Custom Events, you can also check out this great video summary:
Facebook Custom Events Example
We have a separate guide where we show you many examples of Facebook Custom events that you could set up for advanced Facebook Pixel Tracking. In that article we explain of them in details of all these Custom Events:
- Scroll tracking Facebook Custom Event
- Time spent on Page Facebook Custom Event
- Element visibility Facebook Custom Event
- Video watch Facebook Custom Event
- Form submission Facebook Custom Event
- Image and button clicks Facebook Custom Event
- File downloads FB Custom Events
- Internal links
- Outbound links
We won’t get into details here, but just go through this list and see if the Custom Event you want to create is similar to any of the ones we have listed out. That should mean it is probably a good idea to create your Facebook Custom Events.
Two main ways to set up Facebook Custom Events
Currently, there are two main ways how you can implement Facebook Custom Events on your website.
Set up Custom Events in GTM with Custom HTML Tag Method
The first, traditional method is using Custom HTML tags, as Facebook hasn’t implemented an official GTM Template tag for implementing Facebook Pixel events.
In this case, you should always modify the general Custom Event code that looks like the following:
fbq(‘trackCustom’, ‘Custom Event Name’, {additional parameters in JSON formats’});
As you can see, first you would have to call the trackCustom function, then add the name of the Custom Event, and you can also add additional parameters and values in a JSON format.
Then once you customized your Custom Event code, add it as a new Custom HTML tag in GTM and add the necessary GTM Trigger to it.
Set up Custom Events in GTM with Facebook Pixel Custom Template
Another new way to set up Custom Events with Google Tag Manager is to use the Facebook Pixel Custom Template developed by Simo Ahava.
Using the Facebook Pixel GTM Custom Template, you don’t have to use any Custom HTML tags so you might find it a lot easier to set up Standard and Custom Events.
All you have to do to make this method work is to add the Custom Template to your GTM Container as the first step of the setup process.
As we believe that this Custom Template method will be easier to implement for most people and as we also prefer this Custom Template implementation, we will show the step by step setup tutorial with this method.
How to set up Facebook Custom Events in Google Tag Manager with the Facebook Pixel Custom Template?
The easiest way to show how to set up Facebook Custom Events in Google Tag Manager is via an example. We decided to create an Outbound Link Click Custom Event as it might be relevant for a lot of websites but it is also a relatively easier Facebook Custom Event to create.
The 6-step process of setting up an Outbound Link Click Custom Event tag with the Custom Template looks like the following:
- Add the Facebook Pixel Custom Template to your GTM Container
- Create the Pixel PageView event with the Custom Template Tag
- Create the necessary Trigger for the Custom Event
- Create the Outbound Link Click Custom Event Tag with the Custom Template Tag
- (optional): Add parameters and values to your Custom Event
- Preview& Debug the Facebook Pixel Events then Publish your new tag, variables and trigger.
Adding the Facebook Pixel Custom Template to your GTM Container
As the first step, let’s add the FB Pixel Custom Template to our GTM container.
We can easily do this by first clicking ‘Templates’ on the left side of our screen. Then click on the ‘Search Gallery’ button, and search for ‘Facebook Pixel’. Click on the Facebook Pixel Template and then click on ‘Add to workspace’ button.
If you got stuck here, check out this tutorial where we also share screenshots about how to do add this Custom Template to your GTM Container.
Create the FB Pixel PageView with the Custom Template Tag
Then as a next step, we have to add the Pixel Pageview Standard Event to our website if we haven’t added it so far. This is a necessary step before adding any other type of Standard or Custom Events to our website.
To set up the PageView Event, replicate the following process:
- First, at the top of the page, add a name to the tag, e.g. ‘Facebook Pixel – PageView’
- Then add your Facebook Pixel ID. If you don’t know it, read this tutorial on how to find your Facebook Pixel ID
![]()
- As this is the base Facebook Pixel code, leave everything as it is by default in the Tag section
- In the Triggering box, click on the box and add the ‘All Pages’ trigger
- Click on the ‘Save’ button to save the new Facebook tag
- You can test the new Tag with the Preview and Debug mode and you can see if it really fires the PageView tag or there is any issue you need to resolve. If everything works properly, you can publish your new Facebook Pixel Tag
With this the Facebook Pixel base code is also published so we can start setting up our Facebook Custom Events with Google Tag Manager.
Create the necessary GTM Trigger for our FB Custom Event
As we are creating a FB Custom Event it is very likely that the GTM trigger that will make the FB Custom Event fire at the right user action has to be also separately created. Before we would set up the Custom Event tag, let’s make the trigger for it.
As we want to create an Outbound Link Click, the trigger of the Event tag should fire when the link we click on will take us off our website.
First, on the left side of the screen click on ‘Triggers’ then on the ‘New’ button and then ‘Trigger configuration’.
As we want our Custom Event to fire when someone clicks on a link that takes the user to a site where the domain name is not equal to our website’s domain name, as the trigger type click on ‘Just links’.
Here you can leave the first two checkboxes empty now, and select the trigger fires on ‘Some Link Clicks’.
Now we have to define that rule that will define when the tag will fire. The easiest solution here is to choose the ‘Click URL’ variable from the first dropdown list, then the condition should be set to ‘does not contain’ and in the third field add the name of your domain, e.g. ‘roihacks.com’. So whenever the link the user clicks on doesn’t have your domain name in its click URL, this Google Tag Manager trigger will fire the GTM Tags that it is connected to.
![]()
(If you don’t see ‘Click URL’ variable in the first drop-down list, you have to enable the built-in variables by clicking to ‘Variables’ then ‘Configure’ and tick the ‘Click URL’ variable.)
Double-check if everything is set up the right way, add a descriptive name to your Trigger then click on ‘Save’ in the upper right corner.
There are more sophisticated ways to create this outbound link click trigger, but this solution works and it is way easier to do than creating a GTM auto-event variable.
Create the Outbound Link Click Facebook Custom Event with Google Tag Manager
Now, everything is ready to make our Outbound Link Click Custom Event. Here are all the steps to do it:
- Click on Tags on the left side corner
- Click on the ‘New’ button
- Scroll down a little until you see the Facebook Pixel Custom Template, click on it
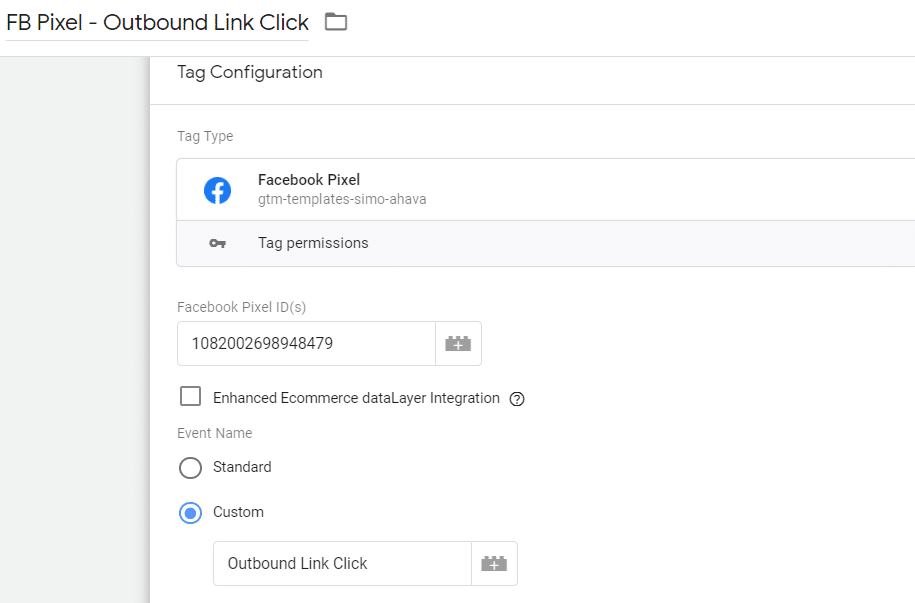
- First, add the ID of your Facebook Pixel in the Pixel ID field (it is the same one as the one you added with the PageView Event tag)
- Then in the Event Name section select the type ‘Custom’ and add the name ‘Outbound Link Click’. You can leave the other advanced options as they are
- Then scroll down to the Triggering section and choose the ‘Outbound Link Click’ trigger we have just created.
- Let’s give a descriptive name to the tag (preferably with the same naming convention that you used with the PageView Event tag) then click on ‘Save’
- In the next paragraph, we will show how to test if the Custom Event tag is set up the right Facebook Custom Event. But if you have done everything correctly, then congrats, you have just created a Facebook Custom Event with Google Tag Manager! It was pretty easy, wasn’t it?
Add parameters to your Facebook Custom Event
As you might know, you can add parameters and values or to use the official term, Object Properties to your Facebook Custom Events. Later you can use these parameters to filter your Custom Events to only include a smaller user group when creating a Custom Audience or a Custom Conversion.
In our Custom Event example, we could add the page path or the category page where the outbound link is clicked or the link URL of the outbound links. We could also add a parameter that would check if the link that is clicked is an affiliate link or a regular outbound link without an affiliate parameter.
Then when we create a Custom Audience to retarget our affiliate link clickers, using these custom parameters we can create a filtered Custom Audience that will only include people who clicked on affiliate links.
In our example, we will only add two parameters, first a page path, so we can filter down the pages where the outbound click was clicked and a link URL parameter, so we can also segment the Custom Event later to only include certain websites, or exclude other sites.
To add object properties to our Facebook Custom Event, we click again to our Outbound Click Custom Event tag, then scroll down to Object Properties, click on it and add the following values:
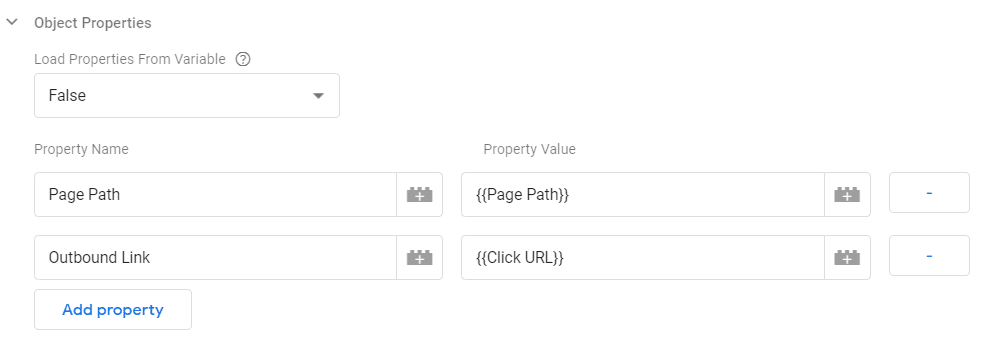
The Property Names can be defined based on your personal preference. The Property Values as you can see are not hardcoded as we have added GTM variables to those fields. So when an Outbound Link Click Facebook Custom Event is fired, Google Tag Manager will dynamically insert the appropriate values based on the link that the user has clicked on.
Preview and Debug Facebook Custom Event tag
Once you added all the parameters to your Facebook Custom Event that you wanted to add, it is time to see if our implementation of the Outbound Link Click Custom Event is done correctly.
With GTM’s Preview and Debug mode, it is really easy to test and check if our Custom Event Tag is firing properly and if it is sending in the right data to Facebook.
To enable the Preview & Debug mode, click on ‘Preview’ in the upper right corner.

When you are in the Preview and Debug mode, you will see this text on an orange background on the top of your GTM user interface.

Once your Preview and Debug mode is active, go to your website, or refresh it, and the Preview and Debug panel will appear at the bottom of the screen, and you will see all the triggers that are triggered and all the tags that are fired as you are browsing the website.
To test if your Facebook Custom Event implementation is correct, reproduce the user action that should trigger the Facebook Custom Event. In our case, we click on an outbound click and check if the Custom Event tag is firing.
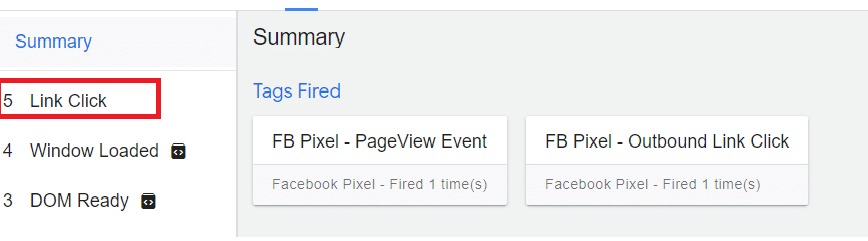
As we can see, the Outbound Link Click has fired in parallel with the PageView Event. To make sure that our implementation is 100% correct, we can click on the Tag and see more details about the event firing and what values were sent in with the Custom Event to Facebook.
We can also test if the Custom Event tag is only triggered for outbound link clicks by clicking on an internal link and check if the Custom Event tag is firing. (it shouldn’t)
Other ways to test our FB Custom Event implementation
The Preview and Debug mode in Google Tag Manager is a great way to test and troubleshoot before publishing our Facebook Custom Event tag to our live website. However, keep in mind that Facebook also provides many other solutions to test and debug our Standard and Custom Events implementation.
In our beginner guide to Facebook Custom Events, we have written in more detail about these tools so now we will only mention that in Facebook Events Manager you can test the Events live on your website, or check out the Overview tab or the Diagnostics tab that will list out all your FB Pixel events including Facebook Custom Events and check if any of them is having any implementation issues.
The other very effective way is to install the Pixel Helper Chrome Extension to your Chrome browser and always check if the Pixel Helper detects any kind of errors with your implementation. You can easily do that by clicking in the Pixel Helper icon and see if it has detected any errors with your Standard and Custom Events.
In our case, we can see that the Pixel Helper is also not detecting any issues and by clicking on the Custom Event we can also see the page path the link was clicked on and the site where the link is going to.
![]()
Next steps after creating Facebook Custom Events with Google Tag Manager
All right, so our Facebook Custom Event has been set up with Google Tag Manager. On its own, it is not that useful, we can add it to our Facebook reporting view but that won’t really help us in any significant way.
You can basically use the Custom Events for three very powerful things that will definitely help you to become more successful with your Facebook ads.
First, when you create FB Custom Audiences from these Custom Events you can use these Custom Audiences to create retargeting campaigns. These are the most effective campaign types to increase your conversions as then you get a better chance to convert people who are closer to a conversion.
The second option you have to use these Custom Audiences to create Lookalike Audiences from them. With Facebook Lookalike Audiences, you can target new cold audiences that are similar to people who triggered the Custom Event you have specified. To learn more about this, read our beginner Guide to LAA and our tutorial on how to create FB Lookalike Audiences.
Last but not least, if a specific Custom Event is an important conversion event on your website, you can make a Custom Conversion from your Custom Event. This way, you can set this as an optimization event in your Conversion campaigns and Facebook will try to optimize for these Custom Conversions and bring in as many conversions as it can.
Facebook Custom Events Setup with Google Tag Manager Summary
Before wrapping this post up, I just want to add, that you shouldn’t worry if not everything was clear to you if this was the first time you have met with the method of setting up Facebook Custom Events with Google Tag Manager. I would suggest reading this post several times and also read our blog posts that are related to this topic, such as:
- Beginner Guide to Facebook Pixel Events
- Beginner Guide to Facebook Custom Events
- Beginner guide to Facebook Standard Events
- How to install the Pixel base code with Google Tag Manager
If you need professional help in any parts of this process or you want us to do all of this custom implementation in GTM without your involvement, we are happy to help you. You can contact us here.
Frequently Asked Questions – Facebook Custom Events with Google Tag Manager
How to create Facebook Custom Events?
Basically, you have two options to create Facebook Custom Events. You can either tell your developer that you need to set up Facebook Custom Events and he will do it for you if he has any experience with it and you have the necessary budget for it. You should at least send the necessary documentation to him or her and then you can just hope that he will implement it the right way.
The second option you have is to leave the developer out, save a bunch of money and not rely on anybody by setting the Facebook Custom Events yourself in Google Tag Manager. It will be also lot easier to change or add new Facebook Pixel events or debug events when they are not working correctly.
How you can set up Facebook Custom Events with Google Tag Manager?
There are two ways how you can set up Facebook Custom Events in Google Tag Manager. You can either use the Custom HTML tag method and customize the Custom Event code Facebook has provided, or you can use the Custom Template Simo Ahava has developed that makes the whole process easier and more GTM-friendly for regular non-coder people.
My Facebook Custom Event is not working, what should I do?
There are many reasons why a certain Custom Event is not working correctly. In our beginner guide to Facebook Custom Events, we have written extensively on how you can see errors of Facebook Custom Events and debug them.
However, when you use used GTM to set up the Custom Event, the easiest way to debug the event is to use the Preview and Debug mode in Google Tag Manager. By enabling the Preview & Debug mode, and going to your website, you should simulate the user action that should fire the Custom Event. When you then click on the Custom Event GTM tag, you should be able to see why the tag has not fired.
