Once you managed to set up the Facebook Pixel base code and the PageView event with Google Tag Manager, the next step is to add Facebook Standard Events with Google Tag Manager. This way, you will be able to track not only basic page views but also the most important user actions that happen on your website.
In this tutorial, we are going to show you the most important things you have to know about setting up Facebook Standard Events with Google Tag Manager:
– why you should set up Facebook Standard Events with Google Tag Manager?
– things to check before setting up Facebook Standard Events with Google Tag Manager
– two methods of setting up FB Standard Events with GTM
– showing you step by step how to set up Purchase Standard Events with Custom Template Tag method in GTM.
This is going to be a long guide, so don’t feel anxious if not everything is clear to you when you read it for the first time. If you are not that familiar with Google Tag Manager but still want to set up these Standard Facebook Pixel Events with, you can also contact us here, so we can do it for you and save you a bunch of time.
But without further ado, let’s get into it.
Why should you set up Standard Events with Google Tag Manager?
As you might know, using Google Tag Manager ts is not the only way you can set up your Standard Events for Facebook Pixel. You can use the Event Setup Tool or (if you are using a popular CMS or e-commerce platform) the partner integration method to create Standard Pixel Events.
However, unlike the other two methods, using Google Tag Manager:
– you can have a fully customizable Facebook Pixel event implementation
– have complete control over implementation and maintenance
– preview and debug your Standard Event Tags before publishing
– set up Facebook Custom Events (only really possible in GTM)
– easily troubleshoot bugs & errors without the help of a developer.
Before setting up Standard Events with Tag Manager
There are three things you should check before starting to set up the Standard Events for your website with GTM.
First, make sure you have installed the FB Pixel base code on your website and it is working correctly. You can easily do that by installing the Facebook Pixel Helper and then just open your website.
Secondly, make sure that you have installed the Facebook Pixel base code with Google Tag Manager. If you want to set up your FB events with GTM, you should also install the Pixel base code with GTM. Although it is not absolutely necessary, it is a best practice to set up everything with Google Tag Manager, as then you also minimize the chance of double-tracking certain Facebook Events that would mess up your complete Facebook tracking.
As you might know from reading our article about installing the Pixel base code with Google Tag Manager, there are two ways to implement Facebook Pixel tracking with Google Tag Manager. You can either use the traditional Custom HTML tag method or use the Facebook Pixel Custom Template developed by Simo Ahava.
So last but not least, you have to also check which setup method you used to set up the PageView Event as then for being consistent in your implementation you should use the same method to set up other Facebook Standard Events with Google Tag Manager for your website.
How to set up Standard Pixel Events with Google Tag Manager?
The easiest way to show how to set up Facebook Standard Events with Google Tag Manager is via an example. Although there are 17 Standard Events predefined by Facebook, once you are able to implement one of them in Google Tag Manager, you shouldn’t have any problems setting up the other 16 Standard Events in GTM.
As an example, we chose to show you the setup of the Purchase event in Google Tag Manager, as the Purchase event is one of the most frequently used standard events and also it also has multiple event parameters that can be set up with the help of GTM.
As we mentioned in the previous paragraph, there are two main ways how you can set up Facebook Standard Events in Google Tag Manager: implementing it with Custom HTML method or using the Facebook Pixel Custom Template created by Simo Ahava.
Setting up Purchase Event with Tag Manager Custom HTML method
For a long time, this Custom HTML setup method was the only way how you could set up the Facebook Pixel with Google Tag Manager.
Basically, you had to get the Pixel base code that Facebook has provided and set it up the PageView event as a Custom HTML tag:
<!– Facebook Pixel Code –>
<script>
!function(f,b,e,v,n,t,s)
{if(f.fbq)return;n=f.fbq=function(){n.callMethod?
n.callMethod.apply(n,arguments):n.queue.push(arguments)};
if(!f._fbq)f._fbq=n;n.push=n;n.loaded=!0;n.version=’2.0′;
n.queue=[];t=b.createElement(e);t.async=!0;
t.src=v;s=b.getElementsByTagName(e)[0];
s.parentNode.insertBefore(t,s)}(window, document,’script’,
‘https://connect.facebook.net/en_US/fbevents.js’);
fbq(‘init’, your_pixel_ID);
fbq(‘track’, ‘PageView’);
</script>
Then as a next step, building on the Pixel base code, you would add the Purchase event with the following Custom HTML tag that would fire on ‘thank-you’ pages:
<script>
fbq(‘track’, ‘Purchase’, {currency: “USD”, value: 30.00});
</script>
Obviously, the value of the currency and value object properties should be sent in as Google Tag Manager variables to Facebook not as hard-coded values.
Setting up a Purchase event with GTM Custom Template method
Although the Custom HTML template was a usable method of setting up Facebook Events in GTM, with the new Facebook Pixel Custom Template the whole process became easier.
We also prefer this method of setting up Facebook Pixel events and for this reason, we are going to show you an example of setting up a Standard Event using this Custom Template Tag method
If you don’t know what Custom Templates are, you can read this article but the basic idea behind them is that they can basically substitute Custom HTML tags with a simple built-in tag-like or 3rd party tag-like interface.
With the Facebook Pixel Custom Template, you wouldn’t have to deal with HTML and javascript code at all and the chance for making errors and messing up your tracking is a lot less likely.
Set up Facebook Pixel Purchase Event with Google Tag Manager step by step
As we prefer using Simo Ahava’s Custom Template, we will show the step by step process of setting up this Purchase FB Pixel event example with his Custom Template. If you want to see the step by step of using the Custom HTML tags method to set up the same Standard Event, let us know in the comment section below.
The whole process can be divided into six distinctive parts:
- Add the Facebook Pixel Custom Template to your GTM Container
- Create the Pixel PageView tag with the Custom Template Tag
- Create the Purchase Event by setting up a new Custom Template tag
- Create the necessary Tag Manager variables so you can insert them to the necessary values of the Purchase event.
- Add the variables as parameters and values of the Purchase Event
- Preview& Debug the Facebook Pixel Events then Publish your new tags, variables and triggers.
As a step zero, you should create the Facebook Pixel ID and also have a Google Tag Manager container that is placed properly on all pages of your website. If you don’t know how to get your Facebook Pixel ID, check out this article.
So, let’s go through these six points step by step showing all of them with screenshots so you can easily replicate this process.
Add the Facebook Pixel Custom Template to your GTM Container
By adding this Facebook Pixel Custom Template created by Simo Ahava you can implement your complete Facebook Pixel tracking without dealing with any Custom HTML tag that can be quite complicated or at least intimidating for inexperienced Google Tag Manager users.
To add the Facebook Pixel Custom Template to your Google Tag Manager, do the following:
- Open your Google Tag Manager account
- On the left side, click on ‘Templates’
- Then click on the ‘Search Gallery’ button
- Search for ‘Facebook Pixel’
- Click on Facebook Pixel Custom Template then click on ‘Add to Workspace’
If this step by step process was not 100% clear, or you got stuck, you can get more help with screenshots if you check out our article on how to install the Pixel base code with Google Tag Manager.
Create the Pixel PageView tag with the Custom Template Tag
Once we have added the Custom Template to our workspace, as the next step we have to add the Pixel base code so that we can trigger the PageView tag on our website. This is a necessary step before we could add any Facebook Standard or Custom Events to the website.
To set up the PageView Event, replicate the following process:
- On the left side of the screen, click on Tags, then click on New, then on Tag Configuration
- Now by searching for the term ‘facebook’, you can find your Facebook Pixel Template you have just added to your workspace, click on it
- First, at the top of the page, add a name to the tag, e.g. ‘Facebook Pixel – PageView’
- Then add your Facebook Pixel ID. If you don’t know it, read this tutorial on how to find your Facebook Pixel ID
![]()
- As this is the base Facebook Pixel code, leave everything as it is by default in the Tag section
- In the Triggering box, click on the box and add the ‘All Pages’ trigger
- Click on the ‘Save’ button to save the new Facebook tag
- You can test the new Tag with the Preview and Debug mode and you can see if it really fires the PageView tag or there is any issue you need to resolve. If everything works properly, you can publish your new Facebook Pixel Tag
Create the Purchase Event by setting up a new Custom Template tag
Once you have set up the PageView Event, you can freely add as many Facebook standard and custom events to your website as you want.
In this example, we will show the process of setting up a Purchase Standard event as it will be relevant for a lot of types of businesses.
We have divided the standard event setup process into three distinct parts.
- First, we will set up the Purchase event with no additional parameters and add the necessary trigger so that the event fires at the right time.
- Next, we will talk about creating the necessary Tag Manager variables that can be inserted into the right property values.
- Last but not least, we will add the additional Object Properties to the Purchase event.
Set up the Purchase Event Google Tag Manager tag without parameters
The process is fairly similar to setting up the PageView tag which we went through in the previous step. Here is what you have to do:
- Click on Tags, then click on New, then on Tag Configuration
- Now by searching for the term ‘facebook’, you can find your Facebook Pixel Template you have just added to your workspace, click on it
- First, at the top of the page, add a name to the tag, e.g. ‘Facebook Pixel – Purchase Event’
- Then add the Pixel ID of your website in the Pixel ID section. (It is the same one, you added for the Pixel PageView tag)
- As the Purchase event is a Standard Pixel Event, in the Event name section, we will change the PageView to Purchase as you can see in this picture:
![]()
6. As we don’t have any Tag Manager variables set up yet, we will skip the Object Properties section for now as we will add the event parameters later
7. As a final step, we have to add the GTM trigger that will specify when the Purchase Event Tag should fire. In our case, as we use WordPress GTM Plugin on a Woocommerce website, I can fire the Purchase event when a certain Purchase Custom Event is triggered.
So first I click into the ‘Triggering’ box section then click on the plus icon in the upper right corner.
8. Next, we click into the ‘Trigger Configuration’ box, scroll down in the Trigger type list until we see ‘Custom Events’, then click on it:
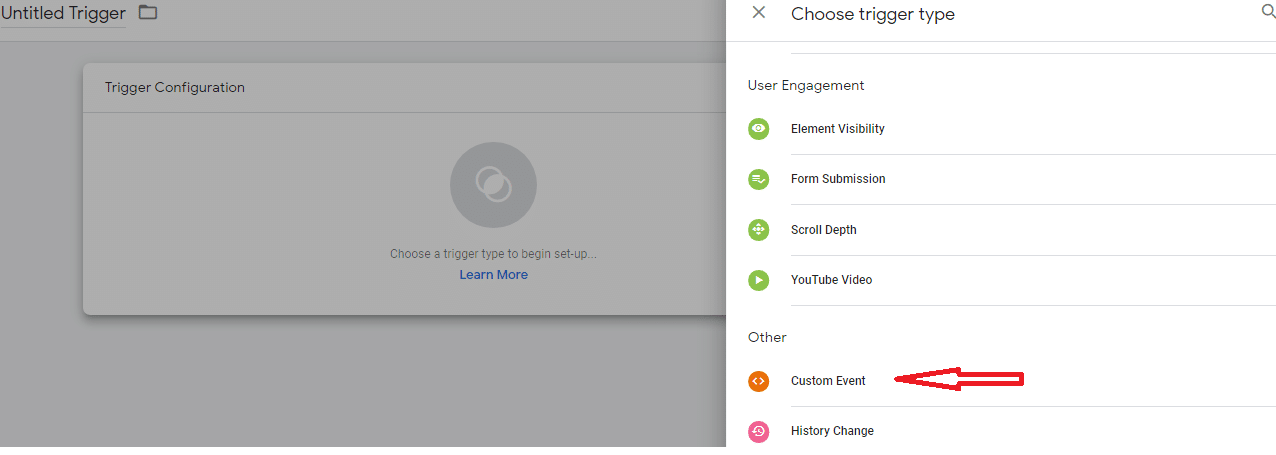
9. As we checked it previously, we know the name of the Custom Event that is pushed to the dataLayer when we purchase a product on our WooCommerce website, so we paste that into the Custom Event name field: ‘gtm4wp.orderCompletedEEC’
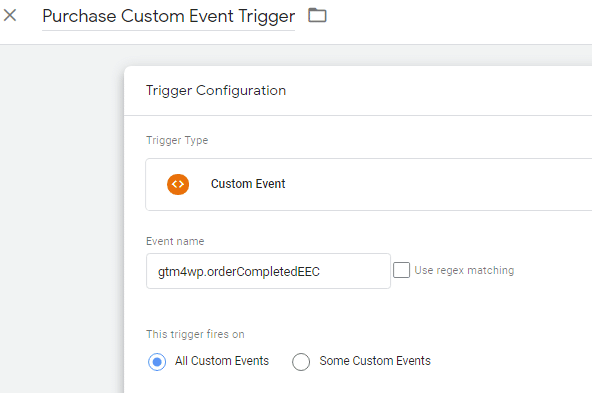
10. Finally, we add a descriptive name to the trigger and click on the ‘Save’ button in the top right corner
11. We double-check everything one more time and click on ‘Save’
If you don’t see a GTM Custom Event firing when someone makes a purchase on your website, then you can also check the URL of the page the customer lands on (usually a thank-you page) and use it as a PageView trigger. Just make sure that the ‘thank-you’ URL is not used anywhere else on the website.
You can test whether the FB Purchase Event is firing correctly with the Preview and Debug mode as we will show at the end of this article.
Create the necessary Tag Manager variables for the object properties of the event
If we have worked correctly so far, from now on when someone lands on the ‘thank-you’ page of our website, Facebook’s Standard Purchase Event should be fired.
However, so far we only implemented an incomplete Purchase Event, as we haven’t sent in any event parameters and corresponding values with the Standard Event.
We have to create the Tag Manager variables first, so we can insert those in the Object Properties section of the Purchase event and then the values that are sent to Facebook will dynamically change based on the specific purchase event.
In our case, as we use a WooCommerce website, we have installed the Google Tag Manager for WordPress plugin and enabled the WooCommerce integration in it. This way it is quite easy to make GTM variables from the dataLayer keys.
If you don’t have a plugin that automatically pushes the proper Purchase dataLayer keys and values, you have to ask your developer to send in the necessary elements in the dataLayer.
As an example, we will make the dataLayer variable that will insert the total value of the transaction. We can achieve this by doing the following:
- Click on the Variables button on the left side of this screen
- Scroll down to the User-Defined Variables, then click on ‘New’
- Click into the ‘Variable Configuration’ box
- Choose ‘Data Layer Variable’
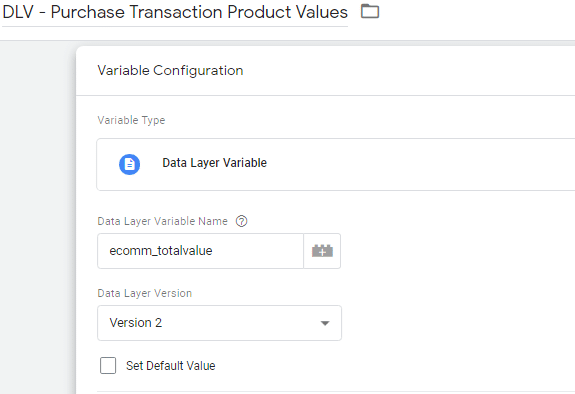
- In the Data Layer Variable Name field add the key of the dataLayer, in this case, it is ‘ecomm_totalvalue’
- Add a descriptive name to the DLV and then click save
You can follow this process for all the other event parameters that you want to send in with your Standard Events.
Add the Object Properties to your Facebook Standard Events
Once you created all the necessary GTM variables, now we can finalize our Facebook Standard Purchase Event by adding the necessary Property Names and Values to our Purchase event. You can do that by doing the following:
- Open your Purchase Event tag we have already created by clicking on it
- Click on the Tag Configuration box so you can edit it.
- Scroll down to Object Properties section and click on it
- You can add an Object Property by clicking on the ‘Add Property’ button
- You will see two columns, the Property Name and Property Value column.
- In the left columns, you should add the Object Properties that are specified in the official Facebook developer website or add your Custom Parameters
- In this case, we add four object properties as these are necessary for running dynamic product ads on Facebook: ‘content_type’, ‘content_ids’, ‘values’ and ‘currency.
- For the property values, we can hard-code two of the object properties, as the content_type will always be ‘product’ and the currency as it is a US store will always be ‘USD’.
- For the ‘content_ids’ and the ‘value’ property names we will add the GTM variables we have created in previous steps. So the Google Tag Manager will dynamically insert the values and the ids of the products based on the Purchase information.
- We double-check if everything seems to be fine, then click on the ‘Save’ button
![]()
Testing Facebook Standard Events before Publishing New GTM Tags
Whichever method you used to set up your Facebook Pixel Events, you should test the new GTM tag before publishing it to the live website.
GTM Preview and Debug mode
You can easily do this in Google Tag Manager with the Preview and Debug mode. This mode enables you to test the new Standard Event tag on your website and see if it fires correctly and if it sends the right parameters and values to Facebook.
To enable the Preview & Debug mode, click on ‘Preview’ in the upper right corner.

When you are in the Preview and Debug mode, you will see this text on an orange background on the top of your GTM user interface.

Once your Preview and Debug mode is active, go to your website, or refresh it, and the Preview and Debug panel will appear at the bottom of the screen, and you will see all the triggers that are triggered and all the tags that are fired as you are browsing the website.
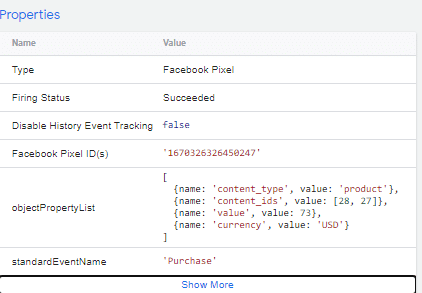
To test if your Facebook Purchase Event implementation is correct, reproduce the user action that should trigger the Facebook Standard Event. In our case, we make a test purchase on the website and check it the Purchase Pixel Event is firing:
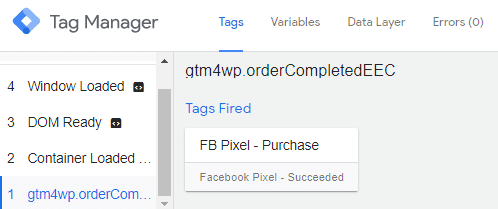
As we can see, the FB Pixel Purchase event has fired and the right parameters and values were also sent in. To make sure that our implementation is 100% correct, we can click on the Tag and see more details about the event firing and what values were sent in with the PurchaseEvent to Facebook.
Other methods to test Facebook Standard Events
The Preview and Debug mode in Google Tag Manager is a great way to test and troubleshoot before publishing our Facebook Standard Event tag to our live website. However, keep in mind that Facebook also provides many other solutions to test and debug our Standard and Custom Events implementation.
In our beginner guide to Facebook Standard Events, we have written in more detail about these tools Facebook provides so in this article we will only mention that in Facebook Events Manager you can test the Events live on your website, or check out the Overview or the Diagnostics tab that will list out all your FB Pixel events including Facebook Standard Events and check if any of them is having any implementation issues.
The other very effective way is to install the Pixel Helper Chrome Extension to your Chrome browser and always check if the Pixel Helper detects any kind of errors with your implementation. You can easily do that by clicking in the Pixel Helper icon and see if it has detected any errors with your Standard and Custom Events.
![]()
In our case, we can see that the Pixel Helper is detecting an issue although it is not related to our Purchase Standard Event implementation It has an implementation warning because the Facebook Pixel is not paired with a Facebook Catalog.
As we can see the Pixel Helper also shows that the Purchase event fired correctly and sent in the right purchase event parameters and values.
Facebook Standard Events with Google Tag Manager Summary
This was a massive tutorial, so congratulations if you managed to get through it and even more kudos to you if you managed to implement the Facebook Standard Events you wanted to implement with Google Tag Manager. For clarification, you can also check out this video:
Once again, if you got stuck and get professional help from us or would like to take our done-for-you FB Pixel setup service, you can contact us here.
Before we would wrap up if you need a refresher on Facebook Standard and Custom Event, please also check out this article:
